
Not long ago, Adafruit released there I2C FRAM breakout board. This board offers 32 kbytes (256 Kbits) of storage space and the ability to be read/written to ten trillion times. That is a lot of cycles and much more then most any project could need. Just to put that in perspective that is one hundred million more writes then the max amount for the built in EEPROM of an Arduino.
Adafruit released a library that would allow you to read and write to the FRAM, though it is only 8 bits at a time. So if you wanted to store a number larger then 255 you would be out of luck. Knowing this, I took the library and added some features that I believe will come in handy to someone.
After I revived my FRAM breakout, and I found that “out of the box” I could only write in 8 bits I thought about creating a way to write 16 bits to the memory. The MB85RC256V, which is the FRAM chip that is used in this breakout only has the ability of saving 8 bits of data per memory location. I thought about this and I figured that I could write a function (write16) which would take a 16 bit variable and split it into two parts, then save the two 8 bit half’s into two memory locations.
In order to split a given variable into two 8 bit parts I used Bitwise operations saving the first and last 8 bits into their own 8 bit variables (uint8_t in this case). Once this was done, I used the write8 function from the Adafruit library to write the two half’s to memory using sequential memory locations. This means that if I were to write data to memory location 0 I would also write to memory location 1. Though if not careful, and wrote data to memory location 1 you would overwrite the information from your first variable. In order to prevent this I made it so the function changes the location you save to based on the memory location you enter. When entering in 0 as the memory location you would still save to memory location 0, though if you entered 1 you would save to memory location 2 (see Diagram 1). The process is simple, you take the address entered and then add it to itself, and that becomes the first memory location (0+0=0,1+1=2,2+2=4,…). Still using the write8 function would allow you to write to the real FRAM memory locations so if you were to save both 8 and 16 bit values you would need to watch where you store data.
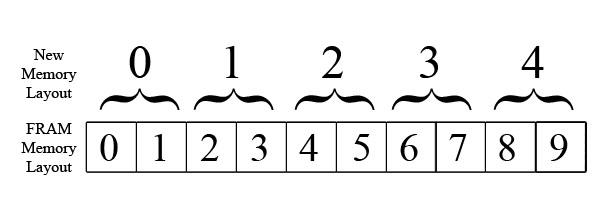
Diagram 1
Once I finished my write16 function, I needed to create a read16 function. I used the same technique for memory mapping that I used for my write function so you can read back the same way as you write. After reading in the two 8 bit values the function combines them back into one 16 bit value and then performs a twos complement check on the number to determine it the value is a negative number or not. I haven’t written in a way to handle unsigned variables yet, but will if it’s needed.
After I finished getting 16 bit variables to work, I thought it would also be useful to write strings to the FRAM memory. I had already worked on code which was able to save Strings to the EEPROM, so I started with that.
When I first started working on my string function, what I did was take the code form my EEPROM string writing project and inserted it into my Fram code. Then I just made some small changes so the correct functions where used for reading and writing. That’s all I did, and it didn’t really work correctly. I thought about going thought the code to see what went wrong but then I thought there had to be a simpler way of writing and reading Strings.
After looking over the process I used for the EEPROM it occurred to me that all I really needed to do was break down the string into characters and then write out the characters individually. For reading the characters back into a string, I just reversed the process and combined the characters back into a string. For this I used the String function concat to preform this task.
Using both functions is really straight forward, if you want to write a Sting to memory you call the write_String function and pass it the starting address and the String itself. Then to read the String back you call the read_String function and pass it the starting address along with the length of the String. With this you have to keep track of the different String lengths in order to read back your information. This is the same thing that needs to be done when writing Strings to the EEPROM and can be handled the same way.
What I wrote for the EEPROM:
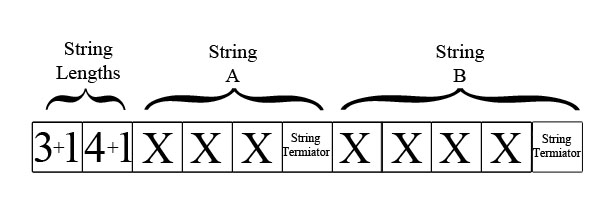
[Starting] at memory location 0 I would store the length of the sting I want to save plus one which would be used for the string terminator. Starting at memory location 1 I would start saving my String. This way I always know how long the String I want is for when I need to read it back. If I wanted to store more the one string, I would follow the same idea. If I had two strings, then the first two memory locations would hold the lengths of each string plus one. Then to read the strings back I would start at the third memory location plus the length, for the second string I would find its memory location by taking the length of the first string plus one.
 This is from the example file I wrote for the library, and it shows how to write and read the String.
|
1 2 3 4 5 6 7 8 |
//Write String String string_test = "The Quick Brown Fox"; Serial.print("\nWriting Sting: "); Serial.print(string_test); Serial.println(" to Memory\n"); fram.write_String(3,string_test); //Read String Serial.print("Reading String: ");Serial.println(fram.read_String(3,string_test.length()+1)); delay(1000);//hold for one second |
Something to note is that I used the length() function to get the length of the string I wanted to read back. If you wanted to store a string and read it back later without knowing what the original String was, then you would need to save it’s length as well as the string to memory.
Also at the end, you will see I added a delay, I found that by reading and then printing the data to quickly you will have errors so to get around this, you need to hold for about a second to allow things in the background to clear.
The example file goes into detail, line by line, how to use all the functions I have added. Though it is pretty straight forward.
I have no admitted use for this library but it was a cool project to work on and I’m happy with how it turned out. I am sure that this will help someone with their project and that is why I did it. If this did help, let me know.
*Update 4/10/16: I made a little change to the read_String function which I am hoping will make the function a little faster
The Adafruit FRAM I2C Plus code can be found on my GitHub: HERE (https://github.com/M-tech-Creations/Adafruit_FRAM_I2C_Plus)
The Adafruit learning guide for the I2C Fram Memory can be found: HERE (https://learn.adafruit.com/adafruit-i2c-fram-breakout)


