While browsing one of my favorite online electronic stores, adafruit.com, I came across something cool. This something was a Wii Nunchuck controller, and upon seeing it I was hit with a flash of inspiration. I didn’t just see a Wiichuck, I saw the makings of a cool computer mouse project!
What I wanted to do, was to make an adapter, which would turn the Wii controller into a mouse, and I wanted to do this in a small form factor. That is why I turned to the Trinket. I have already used the Trinket as a PS/2 adapter, so I know it works well as a USB HID (human interface device), I just needed to program it to interface with the controller, right?
To start, I needed to learn how to use adafruit’s TrinketMouse library. The Example code that is a part of the library uses the following line of code to control the mouse:
TrinketMouse.move(random(), random(), random(),
random() &0x07);
That’s a lot of random, and doesn’t tell me much about how TrinketMouse works. In order to find out what each parameter did, I changed all the random() function calls to zeros. Then went parameter by parameter setting each one to 1, and uploaded the code to see what moved/clicked.
What I found was, the first parameter controls the X direction of the mouse with a positive number moving the mouse to the right. Next was the Y direction, and a negative number moved the mouse up. The third parameter is the scroll wheel and a positive number is scroll up. Last, I found that by using 1, you get a left click and by using two, you get a right click.
With this information, I could now successfully control a mouse on the computer. The next step I had to accomplish was reading the Wii controller.
For this, adafriut links to a great writeup on reading data from the Wii nunchuck using the I²C protocol, which can be found HERE. This was a great starting point to begin from, I later found a different article that broke up some of the functions better (HERE).
After prototyping a little using my Arduino Mega (using Serial messages), I uploaded the code to my Trinket, changing the Wire library for the TinyWireM library. With that, I had a working model, and with the help of a instructables project (HERE), getting smooth mouse movement was easy.
With the help of all these different project’s , I was able to create a fully working mouse (without scroll), and I didn’t need to use a powerful board (like the Leonardo) to do it.
Here’s a video of it in action, enjoy:
Material List:
For the people who would like to build there own, here is what I used, and what you will need.
Hardware:
- adafruit’s Trinket – found HERE (Need to use the 5V version)
- Wii Nunchuk breakout – This keeps you from cutting the end off your controller. I used the Nunchucky which I got from adafruit (HERE).
- Wii Nunchuk – You can gets these anywhere, thought be warned, its reported that 3rd party controllers might not work (read the Nunchucky description)
Software:
For this project to work you need two library’s.
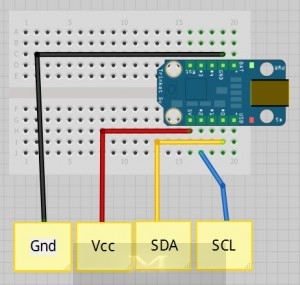
Schematic:
Here is how I wired my Trinket up.
Code:
As always you can find the code to this project on my Github: HERE
I hope you like this project, I know I did and I know I’ll be using this all the time.
Update 2/17/14:
I was able to play with the code some more and I was able to add scroll support. To use scroll, flick the controller to the right and the LED on the Trinket will light up, now when you move the joystick you will scroll up and down. To go back to moving the pointer, just flick the controller to the right again and the LED will go off.


